Hidden Bookcase Door
June 1, 2025

Hidden Bookcase Murphy Door
This is a project I’ve been wanting to make for at least 35+ years. As a kid I’ve always been fascinated with the mystery of hidden doorways and passages like you see in TV and movies. (I did grow up watching Scooby Doo on Saturday mornings 🙂 .) After all these years I’m finally in the position where I can try to make a hidden bookcase door myself… commonly called a Murphy door.

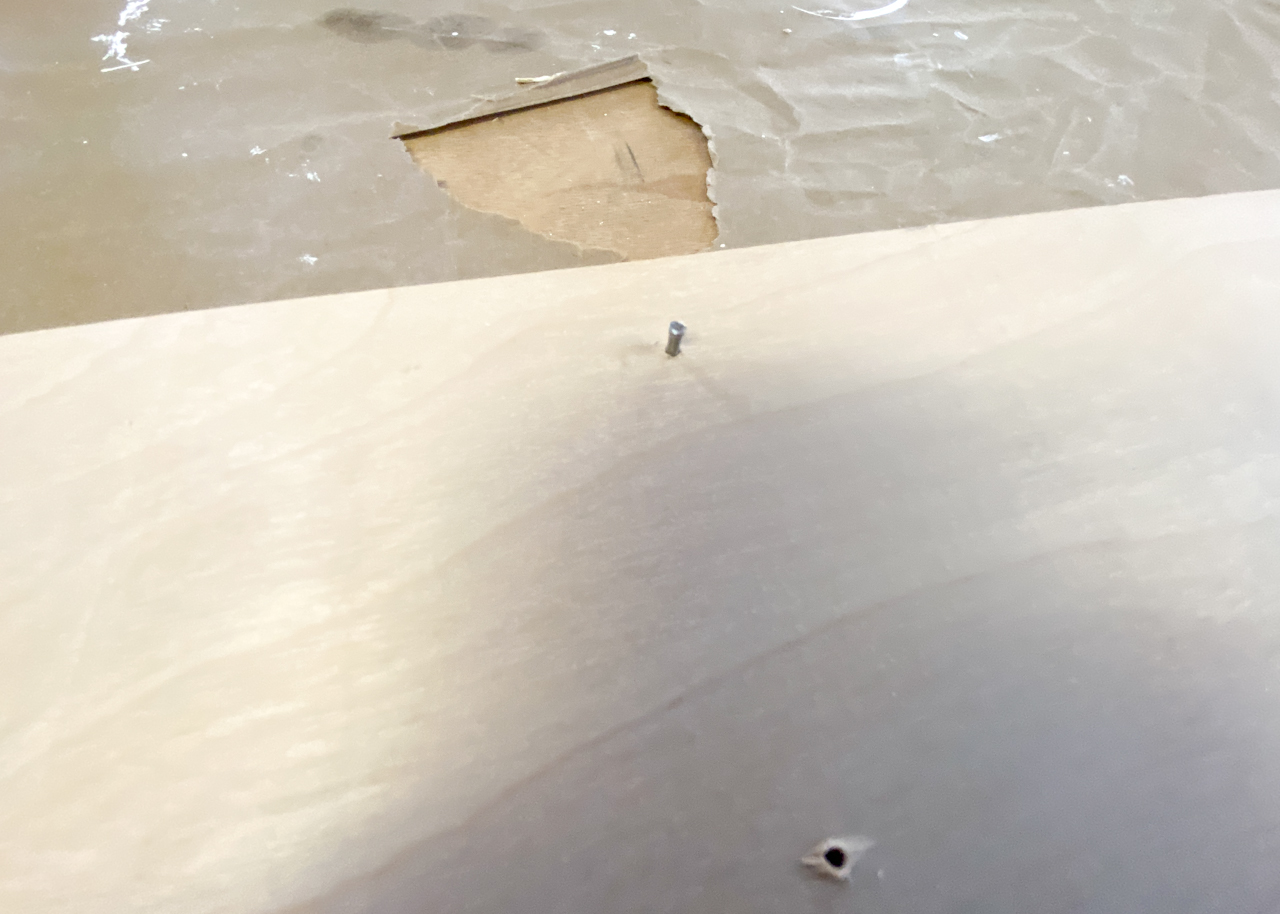
This project actually started as some water damage/mold from a tree branch piecing the roof above a seldom used closet off the master bedroom.

I ended up gutting half the ceiling and back wall to make sure I removed all of the water damage/mold which basically turned into the full closet remodel shown above. (don’t be envious of my shoe rack ladies)

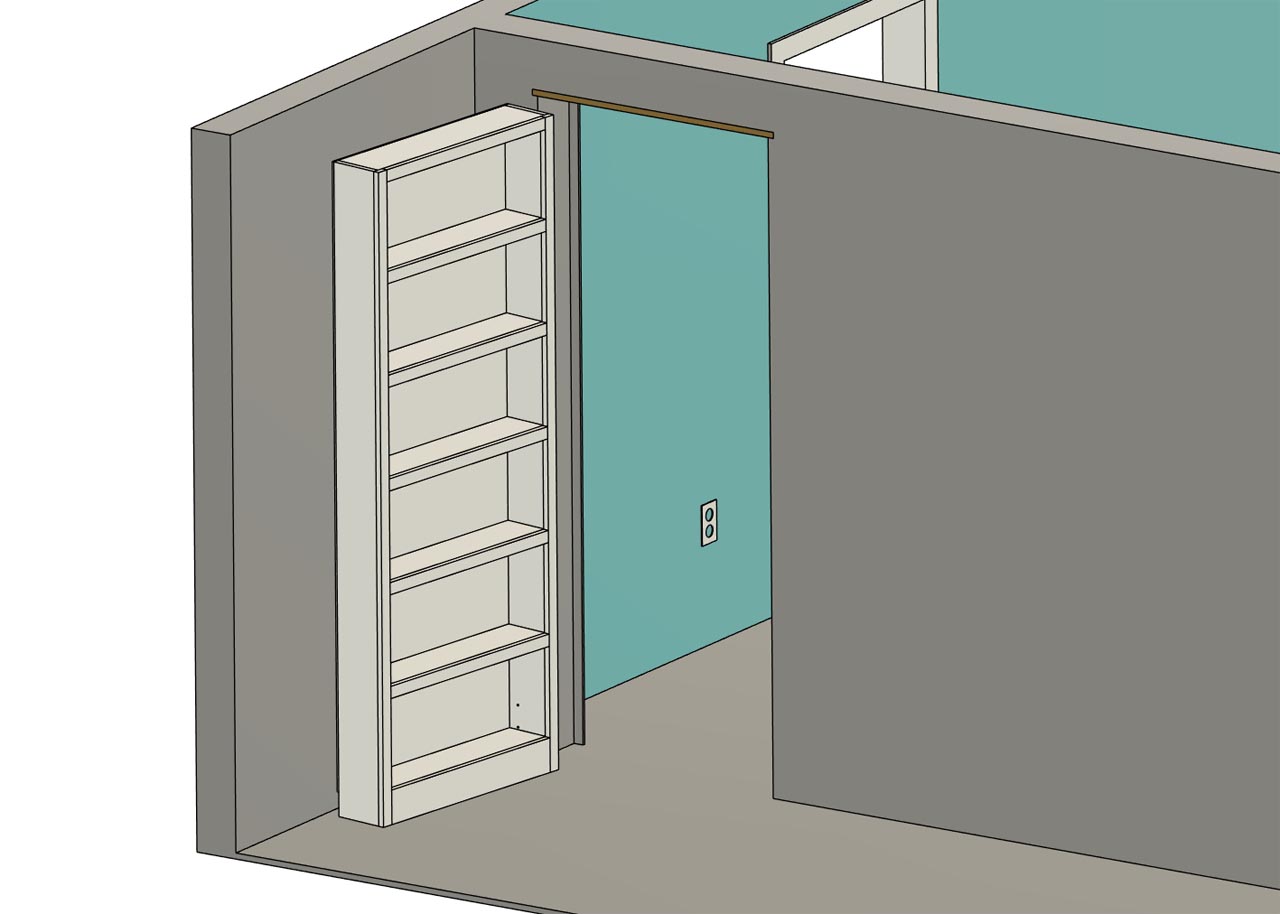
The closet had a 28″ wide door but it’s a 2×6 framed wall so the back side wasn’t trimmed out very well and needed to be redone anyway so this is when I decided to try and make a bookcase door.

While remodeling the entire master bedroom I finally remove the closet door casing and I discovered the roughed framing for the doorway was not exactly done correctly.

There were no king studs and the jack studs were pieced together…

… and the header was also a mess.

While redoing the framing for the doorway correctly I also opened in up to a 34″ wide rough opening.
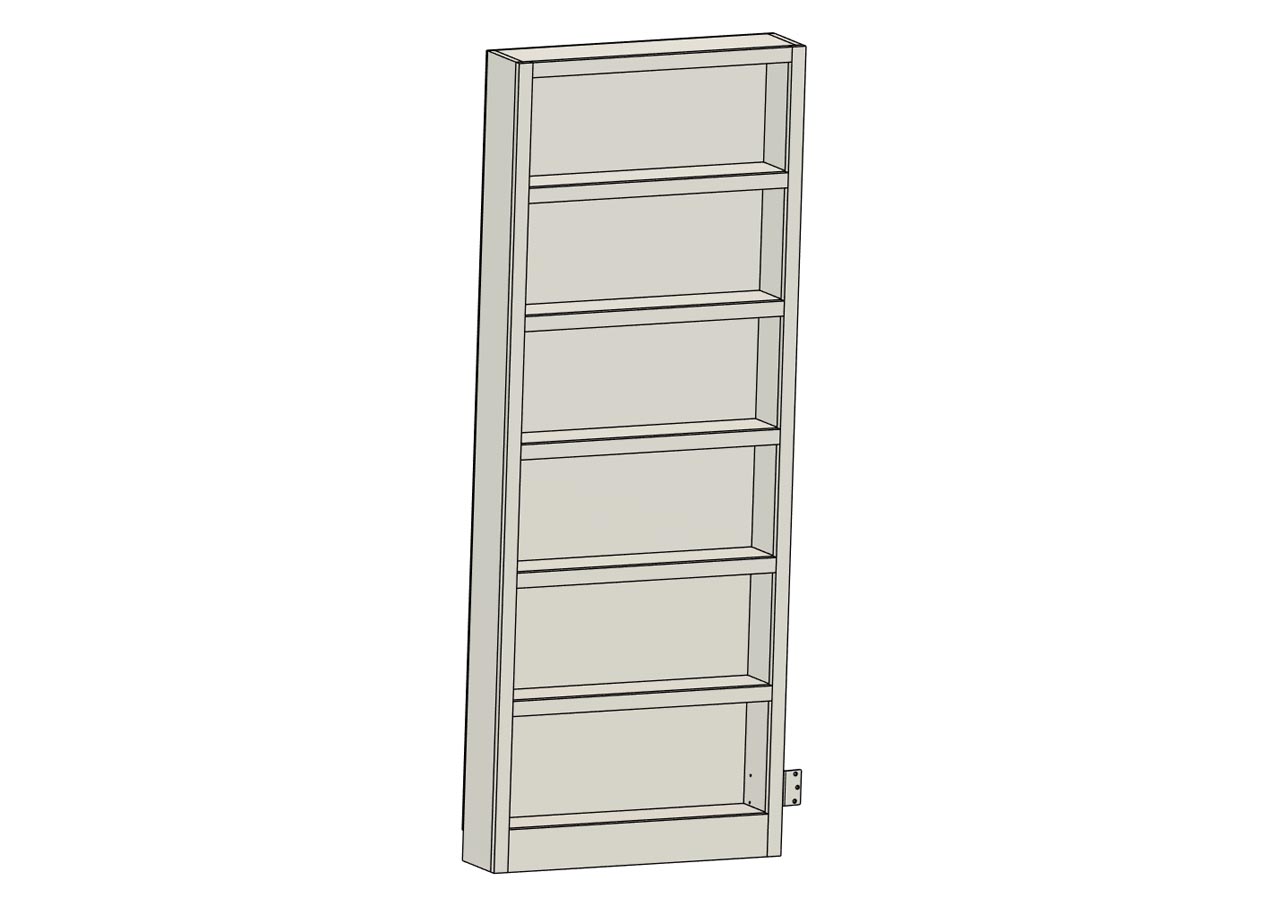
With the rough opening re-framed in I jumped into CAD to figure out how I wanted the bookcase to look. I didn’t want anything to elaborate so I went with this simple design. Plus it should be easy to make this way. (Famous last words…)

CAD also allows me to get a feel for how everything should go together and work in the closet.

With the original 30″ rough opening I bought some offset hinges to use so when the new bookcase door was opened it would swing back allowing for a wider opening into the closet. These probably are not needed now that I went with a 34″ opening but I’m going to still use them because I already bought them. (of course that may lead to issues later on but only time will tell.)
In this CAD model you can see how the offset hinges allow the door to swing back and in by 2 inches. Next it was onto making the actual bookcase. I will be using a single 4′ x 8′ sheet of 3/4″ birch plywood for the bookcase and casing. I’ll skip the boring part of cutting that all up though.

After cutting out the casing pieces I cobbled together a quick jig to router out the mortises for the hinges. (Did I mention I’m not much of a wood worker?… Fake it until you make it.)

Not to bad for that sloppy jig and a 35+ year old router with dull bits.

Like a glove….

Here is the new casings installed and painted.

For the molding on the inside of the closet I just used some cut down 3/4 pine strips… basically lattice strips at this point. (don’t look at my sloppy trim work… “Caulk and paint make me the finisher I ain’t.”

I made this quick little 3D printed drill guide to get perfectly centered pilot holes for the hinges.

It basically self centers in the chamfer to align the drill bit.

Worked like a charm.

While my new casing were straight and level the original wall was not so I had to cut some reliefs in the new molding so the top two hinges stayed aligned.

I used a laser level to make sure all four hinges were in perfect alignment.

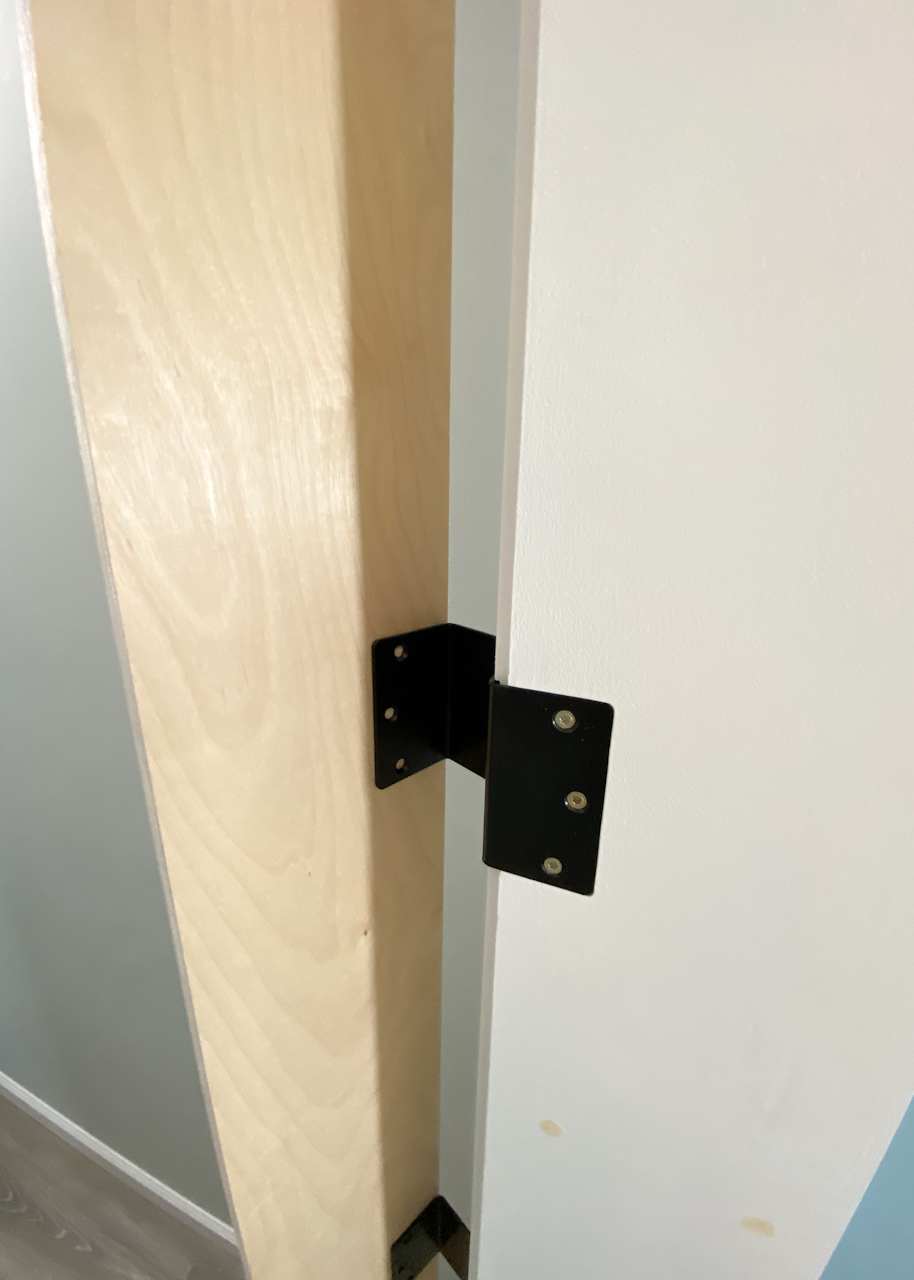
I also added one additional screw in the back side of the hinge to hopefully keep the them from bending. (did I mention these are like 2 1/2″ screws.)

Now a person who knows what they are doing would probably just build the bookcase then hang it on the hinges but I’m not one of those people so I’m just winging it as I go… so I added some double sided tape to the hinges…

…I then stuck the first side of the bookcase to the tape on the hinges while using a 3/4″ block to offset it from the casings face.
This allowed me to test the swing of the hinges…

…as well as figuring out the actual width of my shelf while still clearing the other side of the casing. (even though I designed everything in CAD I really wanted to make sure my clearances were correct.)

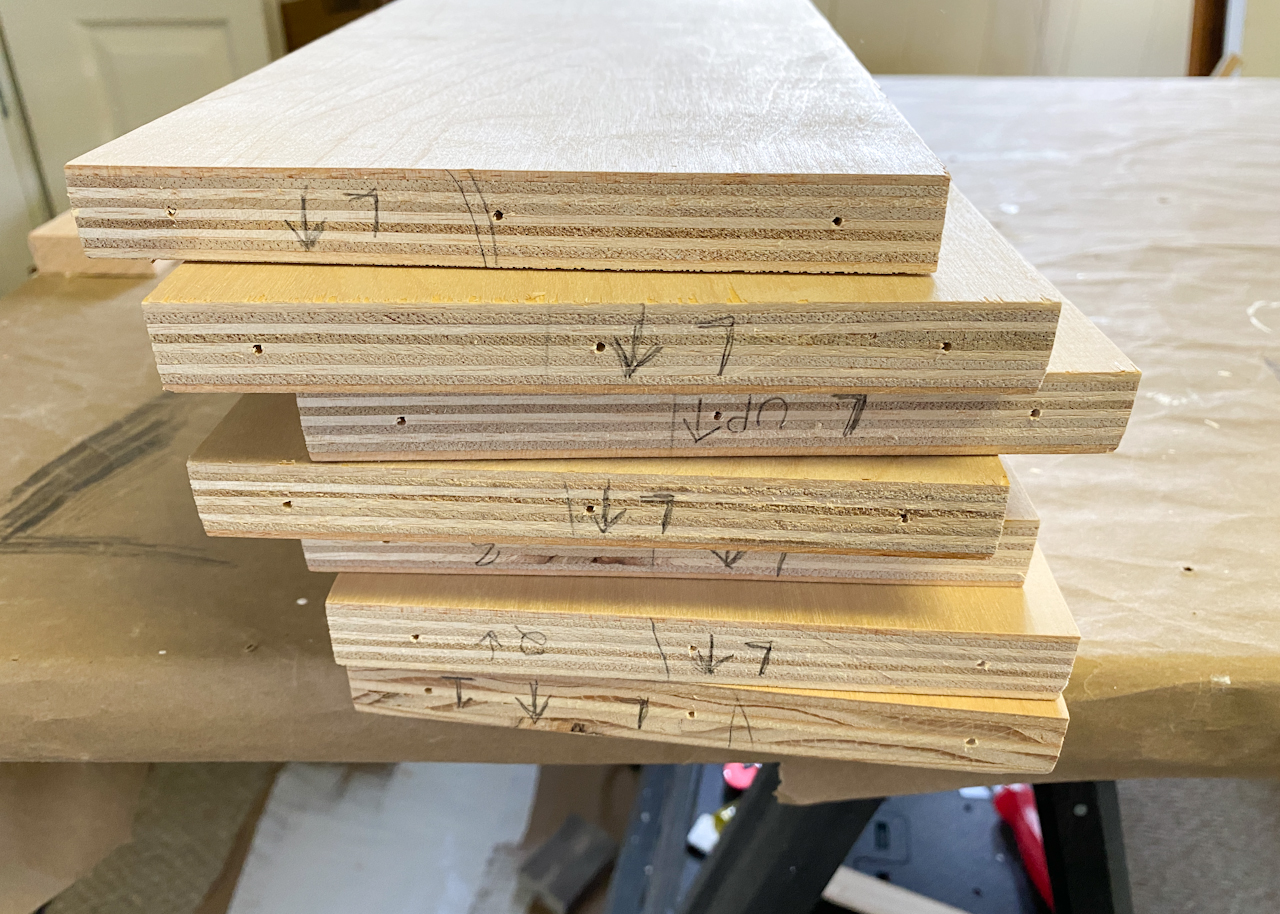
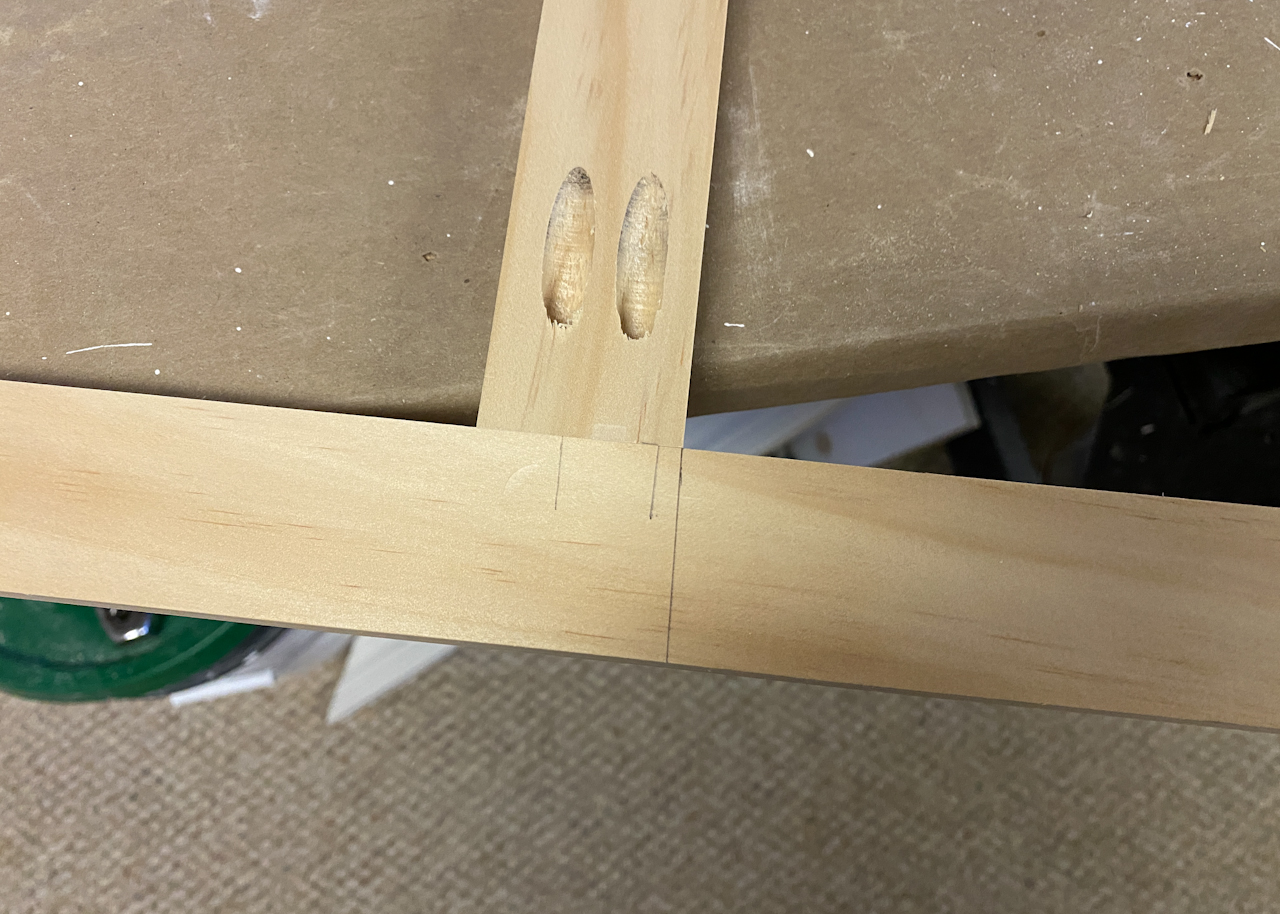
Here are all of the cut pieces for the bookcase. (I did change one thing, I doubled up one side of the bookcase sides to allow for longer screws for the hinges.) With the change I did have to use a different piece of scrap wood for one shelf)

Next it was time to measure and mark the location of each of the shelf’s.

I used another 3D printed jig to drill pilot holes for each shelf.

This should make assembly very easy.

I also counter sunk those holes.

I used the same jig on all of the shelf pieces too. (This thing should go together like a piece of IKEA furniture.)
Here are all of the shelf pieces drilled and labeled.

I started by applying glue to the doubled up side pieces…
I used a few finish nails as alignment pins while screwing everything together.

I use 2 spaces (one on each side) to make sure the shelf’s where straight and evenly spaced while screwing them in place.

At this point all of the shelf’s are glued and screwed in place and I use the spacers to keep everything square while the wood glue dried.

After that I filled in all of the screw locations with wood putty.

Next I used the router to cut a groove in the face of the shelf’s on the hinge side.
This little groove will be to run wires for LED strips to light each shelf later on.

Now it was time to install the hinges using 1.25″ wood screws.

The first test fit.

Right now I have about a 9/16″ space as the door swings open.

There is plenty of room to enter the closet with the door open too. (the offset hinges were probably not needed but I really like them anyway)
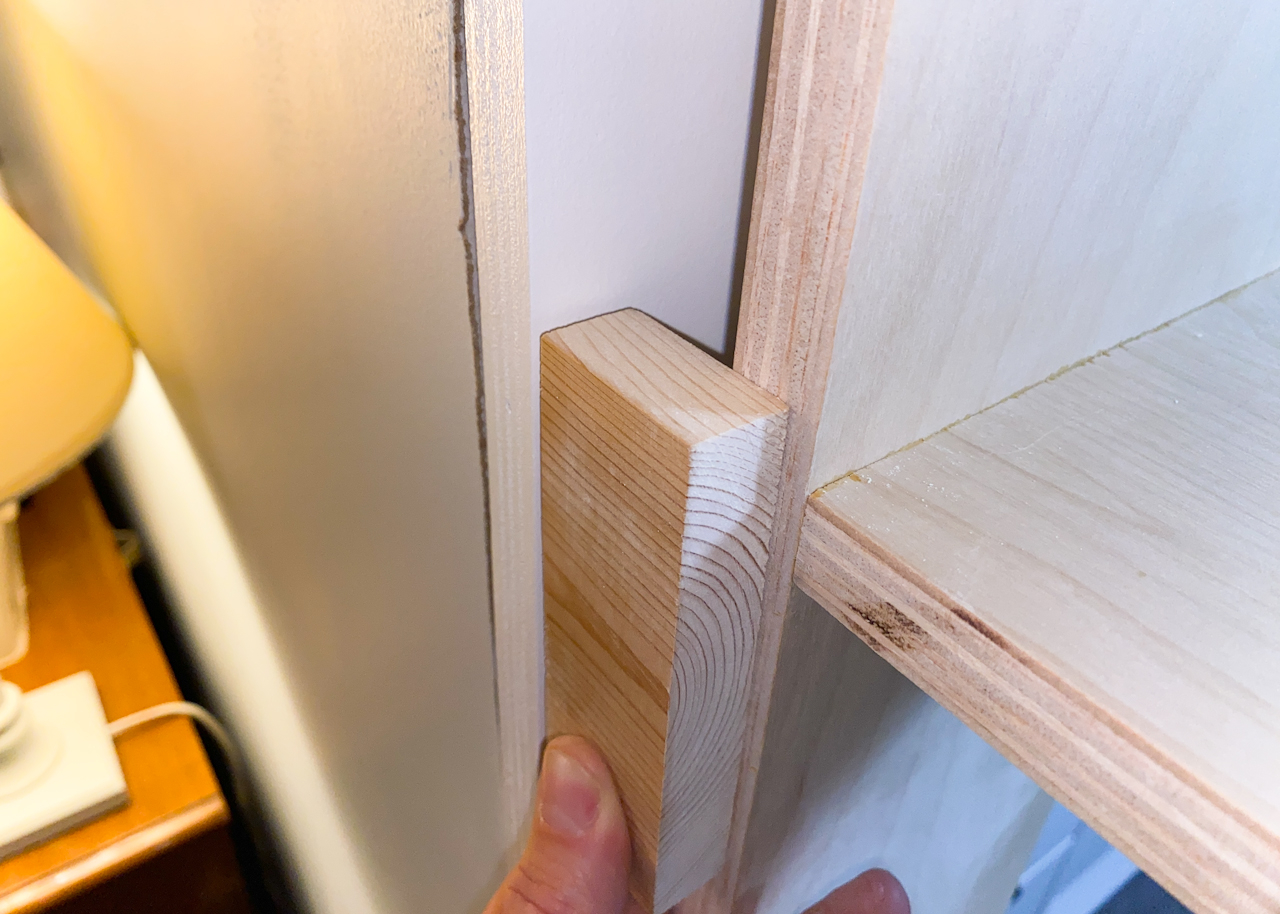
A quick check with the pine block shows the door is off just a bit (it should be flush) it’s a little twisted at the top but this will work out OK when it comes to the door latch later on.
While the door is square I did shimmed up the bottom just a bit to keep it square while I continue to work.

Next it was onto the pine face boards.

Once again a little double sided tape helped keep things in place while I figured out height and width of the face boards.

At this point I also marked each shelf location in relation to the face boards.

The horizontal shelf face board were all cut together so the all were exactly the same.

I will be using pocket screws to assemble the face.

I used a clamp to keep everything flush while gluing and screwing them together.
The face boards are aligned about an 1/8″ above the shelf position. I’m thinking this lip will keep anything from sliding off the shelf in the door is flung open to hard or fast.

One side down… (excuse the mess… the hobby/shop room is next on the remodel list)

So far everything is looking good.

Another test fit so I can figure out the gap to the floor for the bottom piece.

That 9/16″ gap has definitely shrunk to about 1/16″ with the added face boards.

The bottom is on and I also added some temporary bracing to keep things square while it’s on to painting.

I added a coat of primer with one of those cheap harbor freight paint sprayers. While it worked well it was hard to get into all of the shelf areas without getting the nozzle too close.

Here is the painted bookcase. I ended up painting it with semi gloss rattle cans as I was afraid of screwing it up with the HF sprayer. (I need to practice more first with it.)

Next it was time to add the LED strips to the shelf’s. I started out cutting them all to length and then tinning the connection points.

The LED are stuck on to the under side of each shelf and are hidden behind the face board.

I pre-cut lengths of wire and solder each of the ends together as I went for each shelf light.

The wires are then soldered to each LED strip and then continue down to the next shelf thought the groove I previously routed in the shelf’s.
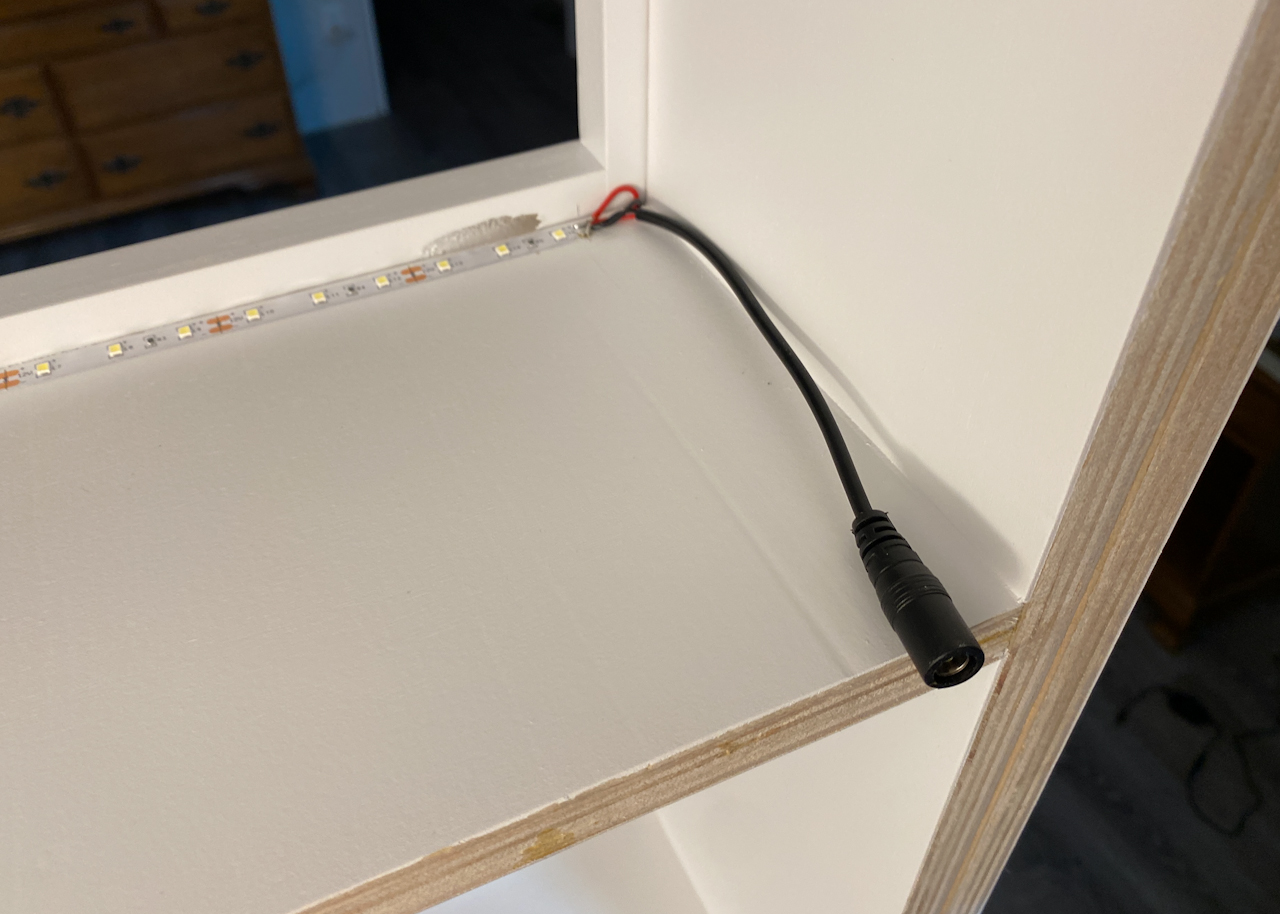
On the very bottom shelf is the original plug that came with the LED strip.

I 3D printed some wire covers to go alone the edges. Even thought the wires are hidden behind the side face board this just cleaned it up that much more.

I quick test to ensure every thing is wired and working.

Next it’s onto the backing. I’m using 1/4″ plywood for this. It’s not the best wood as I had to get it from one of the big box stores but it will have to do as my specialty wood shop didn’t have any 1/4″ birch plywood in stock.

I thought it would be easier to paint before installing the backer but I also though it would be best to tape off where it would glue to the bookcase for best adhesion as this piece would keep everything square in the long run. (I know I do a lot of stuff backwards… did I ever mention I had painting stuff.)

Here it is after paint and it is ready to be installed

I didn’t take any picture of the install but the backing was glued and nailed to the bookcase. I am left with this small area on the bottom back side of the bookcase… and what does a secret door need but a secret drawer.

I found these 3D printed drawer sliders online and modified them to fit my tiny area.

This is how they mount under the bottom shelf.

I didn’t take any pictures of the actual build but this is the finished drawer it was lined with felt to keep the valuables safe and sound. Overall it’s pretty small at only 26″ W x 5.75″ D x 2.25″ H so I don’t know what I’ll put in there but I just wanted to use up the space.

This is the finished drawer when installed.

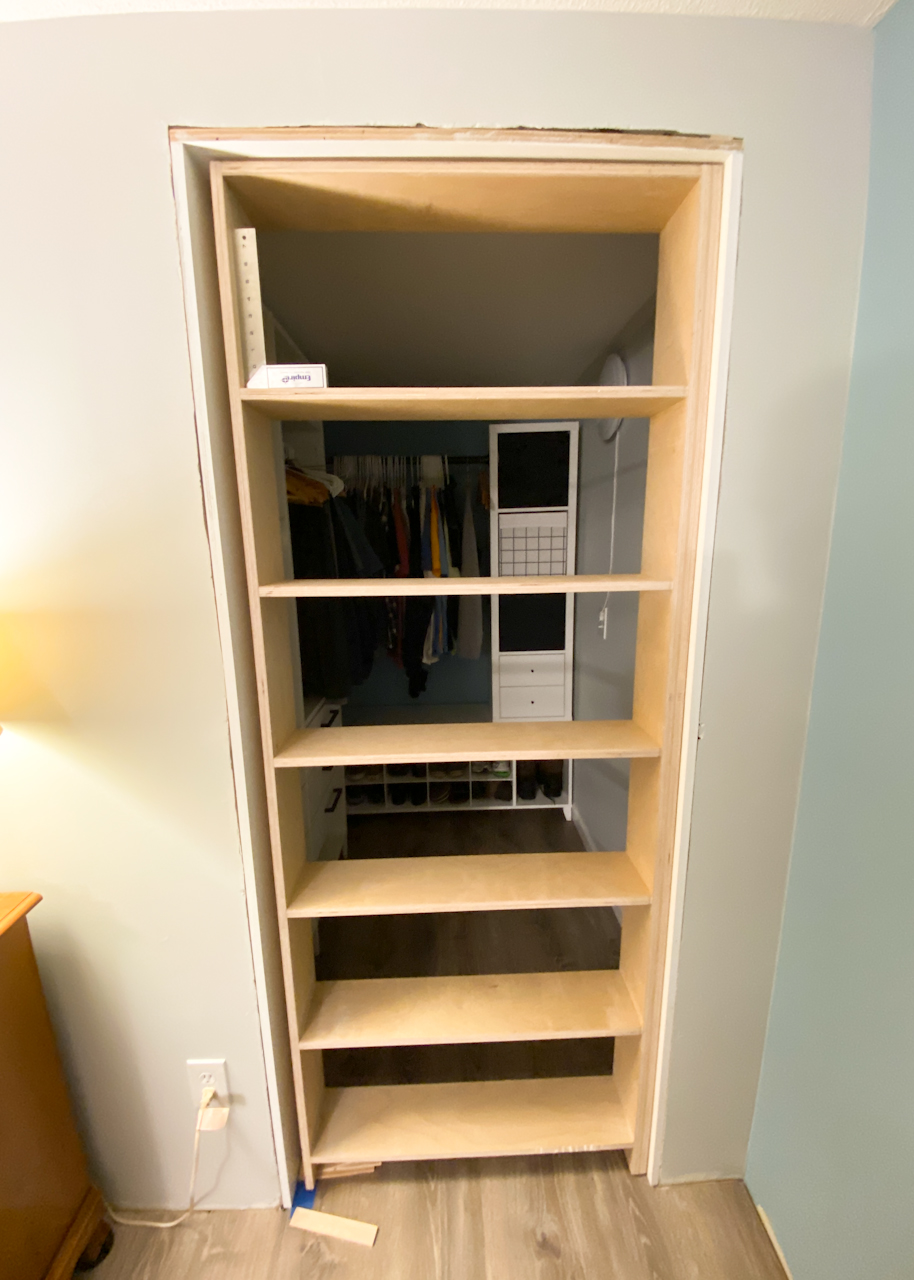
Here is the bookshelf installed. It was quite the task trying to put this in solo, I think the finished weight was right around 53 pounds.

And of course all lit up. These are dimmable but shown at full power in this picture. Now I need to do the trim but I need to add a latch first.

I bought one of these 6″ chain bolt latches that I thought would be perfect but the spring in them is crazy stiff so I decided to return it and just make my own.

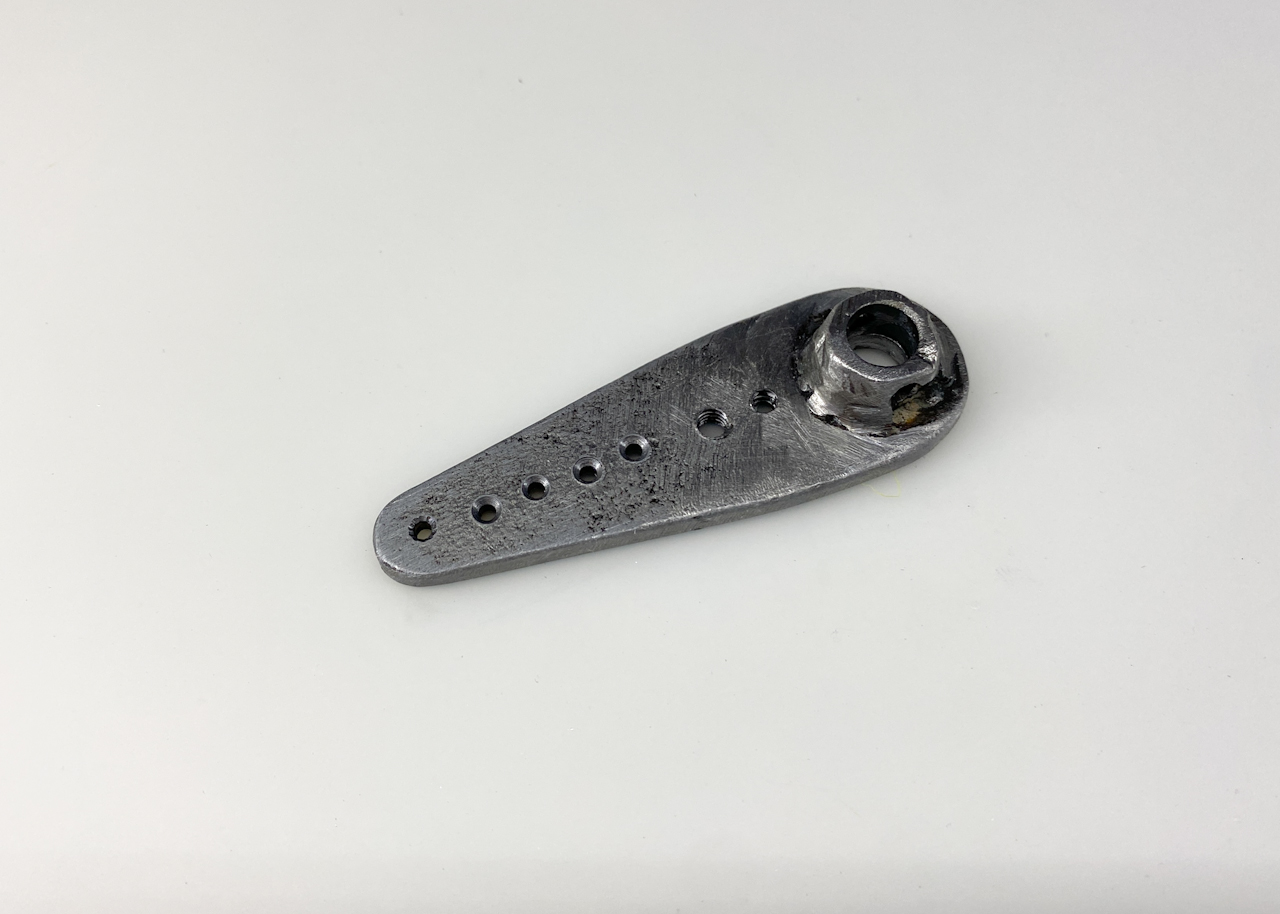
I started with the door latch from the original door.

I started by gutting most of the internal bits of the latch and hacking off the unnecessary end with a Dremal.

I then sketched up an adapter plate on a piece of aluminum.

A little hacksawing and filing and it interfaces with the latch pretty well I think.

I sandwiched it with another plate and some 4-40 screws.

Then is was back into CAD to design up a mount to fit the latch.

A few hours later and the mount was 3D printed.

It’s all coming together…

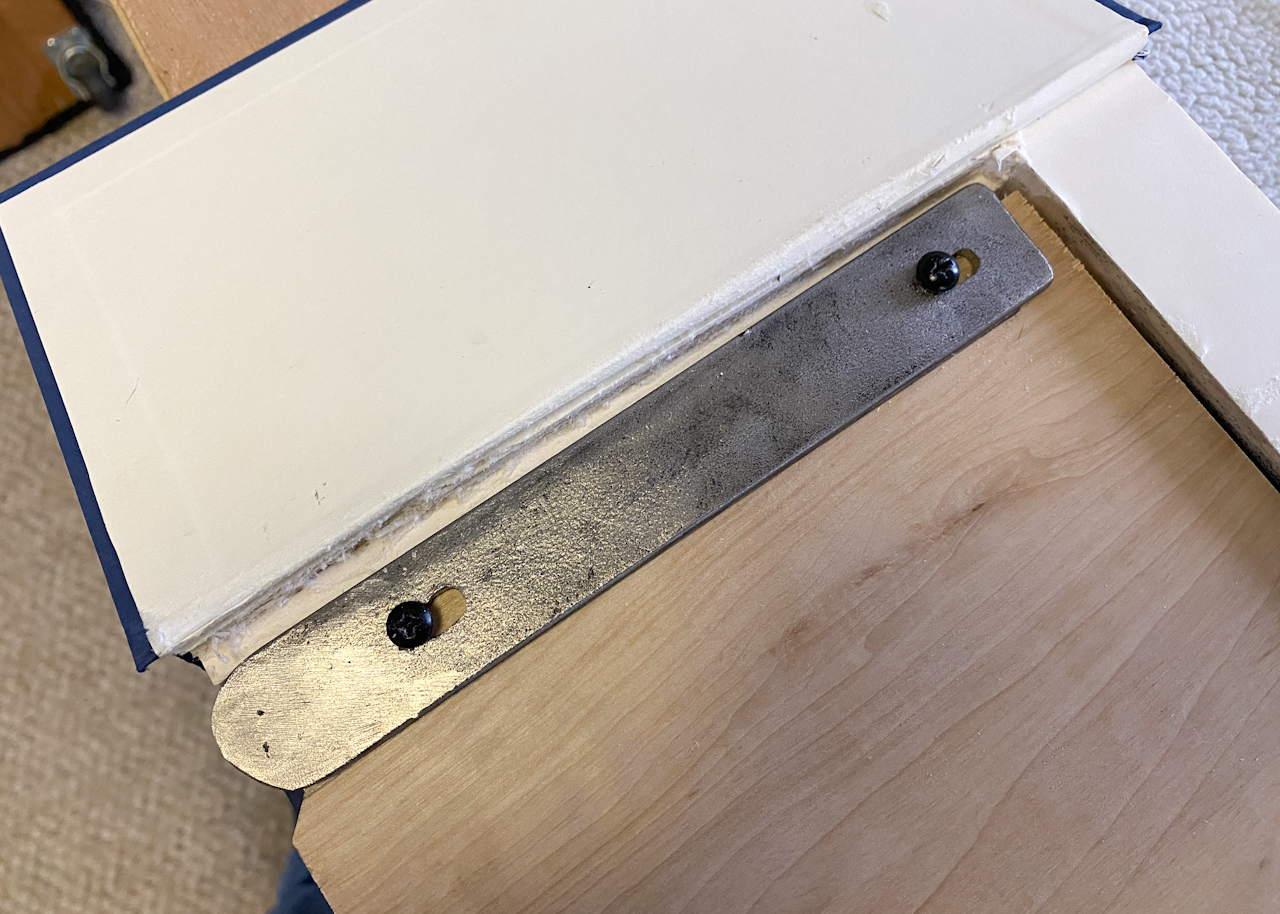
I found this commercial striker plate that I can modify to work with my DIY latch.

Here is the modified striker plate mounted to the top of the door casing.

My DIY latch them mounts to the side of the bookcase door.

It would have been easier to put it on the back but I was afraid if something ever happened to the latch I would have no way to open the door. At least with it on the side if the the worse case scenario happened I could always rip off the front molding to get to it. It is a tight fit so hopefully the door doesn’t sag to much. Next it was onto the release handle…

I picked up a couple of random books from goodwill that fit the shelf and one of these will be used as a lever to activate the latch.

For the release lever part a started by welding a steel rod to a piece of flat stock.

I then trimmed out most of the pages of the book using a bandsaw. I wanted to leave the top section real pages… I’ve seen other setups where they use a piece of wood painted like the edges of the pages but I wanted mine to still look like an actual real book.

I glued all of the remaining pages together by spreading superglue on the cut edge inside the book.

After that a also glued in a piece of scrap plywood.

I notched out the left bottom side cover of the book to make room for the rod. I also cut slots in the flat stock, these will allow the book to move up along the flat rod when it is pivoted on the shelf. I’ve seen other people just round off the bottom edge of the book but my method should look and work better.

A another piece of 1/4″ scrap plywood was glued on top of the 3/4″ ply so the cover sits flush when closed. I also added a few magnets to keep it closed but still accessible if I ever need to do maintenance.
The lever rod was then loosely screwed in place allowing it to move freely.

Next I took some measurements and transferred them to a piece of paper so I could mark where to drill the hole in the side of the bookcase for the rod.

The hole needs to be drilled from the other side because there is no room for the drill along the shelf so I just took a nail and forced it through the side to mark the location on the outside.
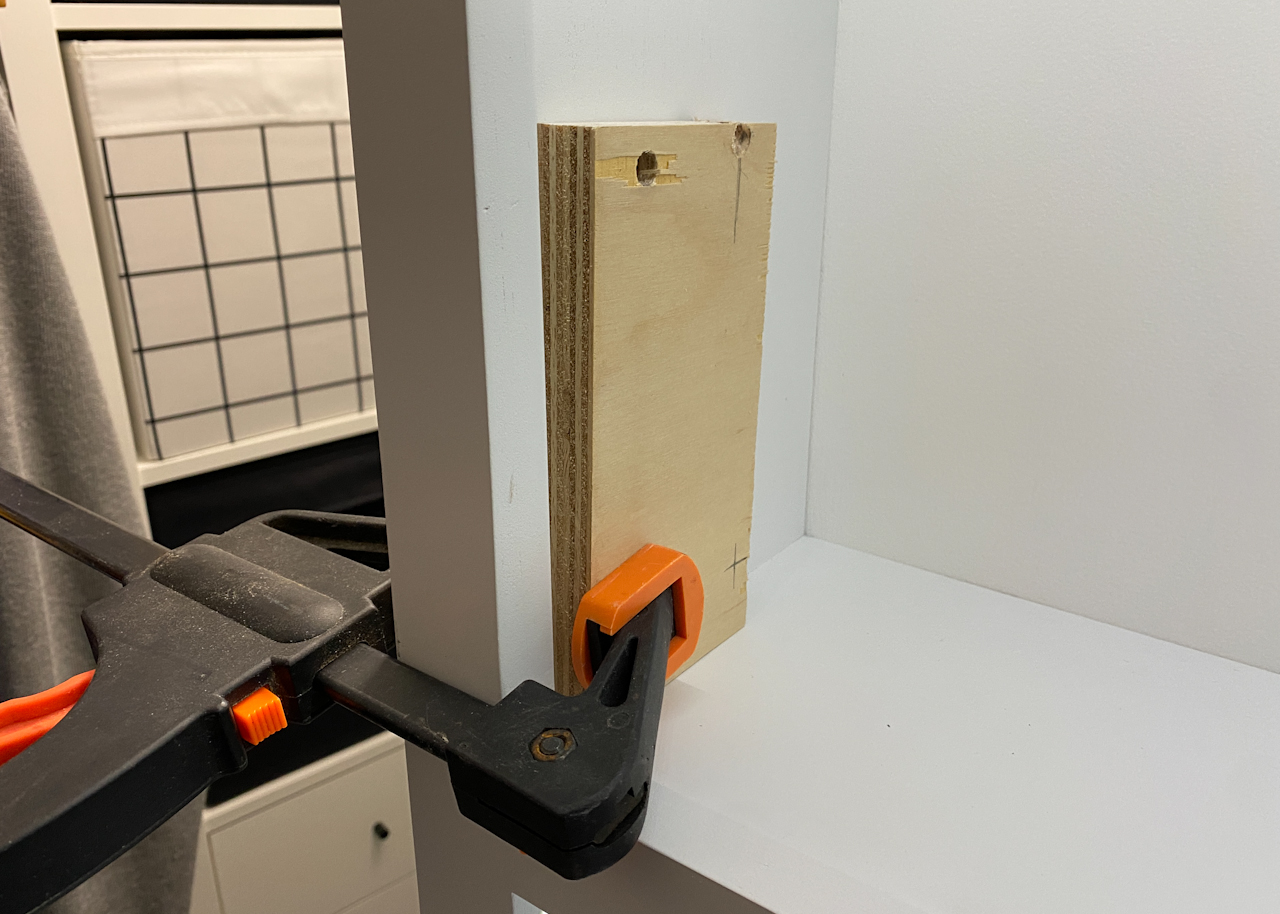
Before drilling I did clamp a piece of scrap on the inside to minimize tear out while drilling.

I first drilled a 1/2″ hole about 5/8″ deep and then completely through with a 5/16″ bit that matched the rod.

This aluminum bushing a turned up will be inserted from the outside and fit into the 1/2 hole to better support the rod. It’s a little overkill but it will also look a lot nicer too once installed.

Next I put the spacer book in place and using a pencil through the hole marked where it needs to be notched out for the rod.

The bandsaw made quick work of making the notch, although it did make a mess.

I cleaned up the notch a bit with a file but didn’t spend to much time on it as no one will ever see it once in place.

The lever book is then installed…

… and the spacer book then covers the rod.
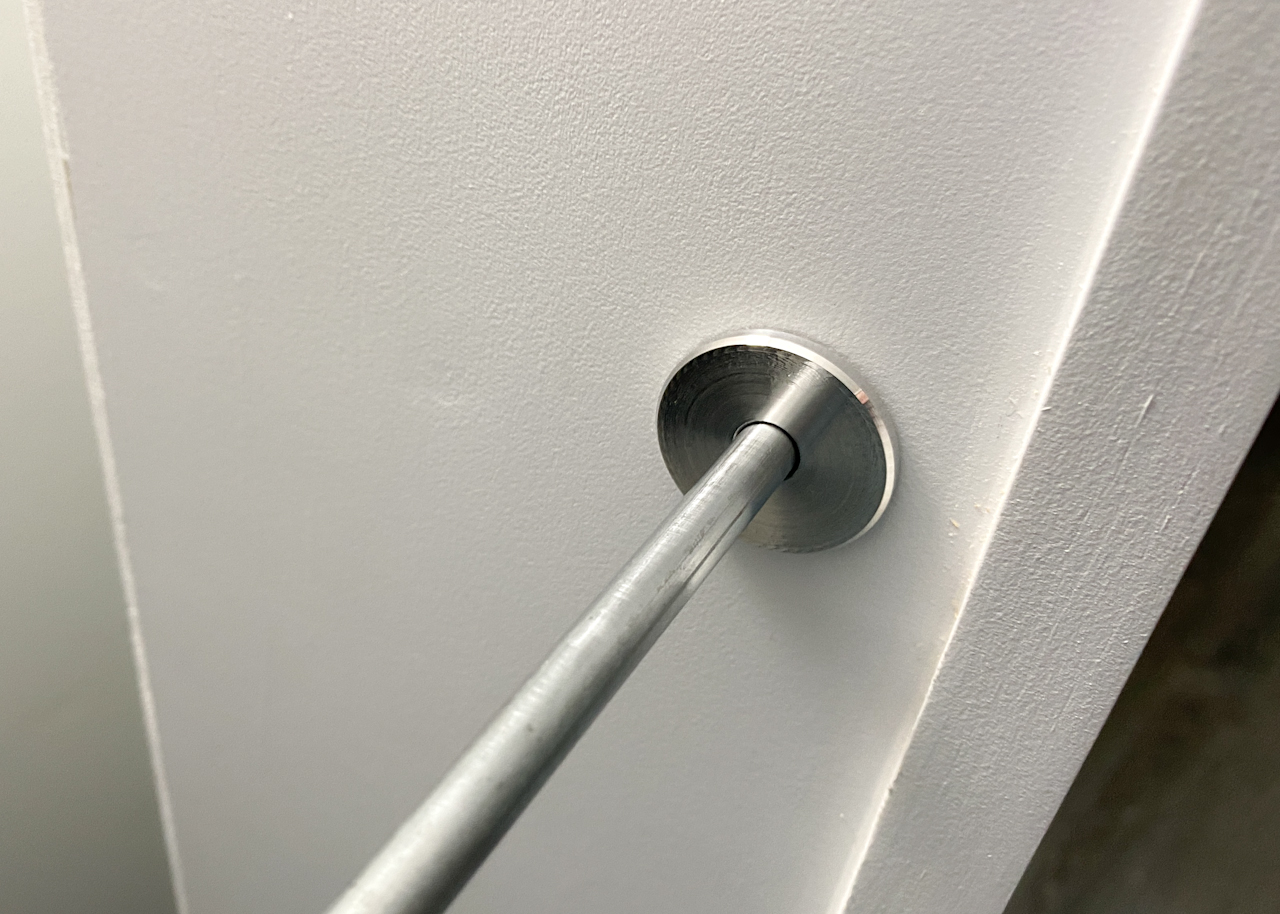
Here is the bushing installed for a finished clean look.

A quick test of the lever and then it’s on to figure out how to connect it to the actual latch.

To make an actuator lever I started by drilling a hole in the side of the nut to fit a 1/8″ steel rod and then drilled out the threads using a 5/16″ bit to match the release lever rod.

Then with some more sloppy welding I attached that nut to some more flat stock and cut out actuator lever shape.

The actuator lever is then slide onto the release lever rod so I could measure and then cut it down to size.
I also drilled a series of holes in the actuator lever.

The release rod was then drilled out to accept the 1/8″ pin which will secure the actuator lever to the rod.

I will be using a steel wire to couple the actuator lever to the release latch which I sourced from one of these Retractable Badge Reels I had laying around.

This is perfect because it already has ring connector on one side.

That end is connected to the release latch with a little bushing I machined up and a 6-32 screw and nut.

The other end of the wire will just be feed into the series of holes I drilled in the actuator arm. The only problem is when the book is pulled the actuator arm travels upwards…

… to change the pull direction I 3D printed a simple pulley. (It was printed in two halves for ease of printing and then glued together.)

I also turned up another aluminum bushing and the pulley will be mounted to the bookcase with a simple wood screw.

The bushing makes for a nice clean look. (again probably a little overkill.)

Here is the finished release actuator arm and pulley setup. The wire is feed back and forth trough the holes and then secured with a 6-32 bolt. It should not be able to slip and I can still adjust the wire length if needed.

I decided to turn the actuator lever into a release lever for the inside. Not that you couldn’t have just pulled on the cable to get out but this printed cover/lever just finishes it off for a cleaner look.

Here what that looks like with the door closed from the inside.

One more shot of the secret doors secret drawer.
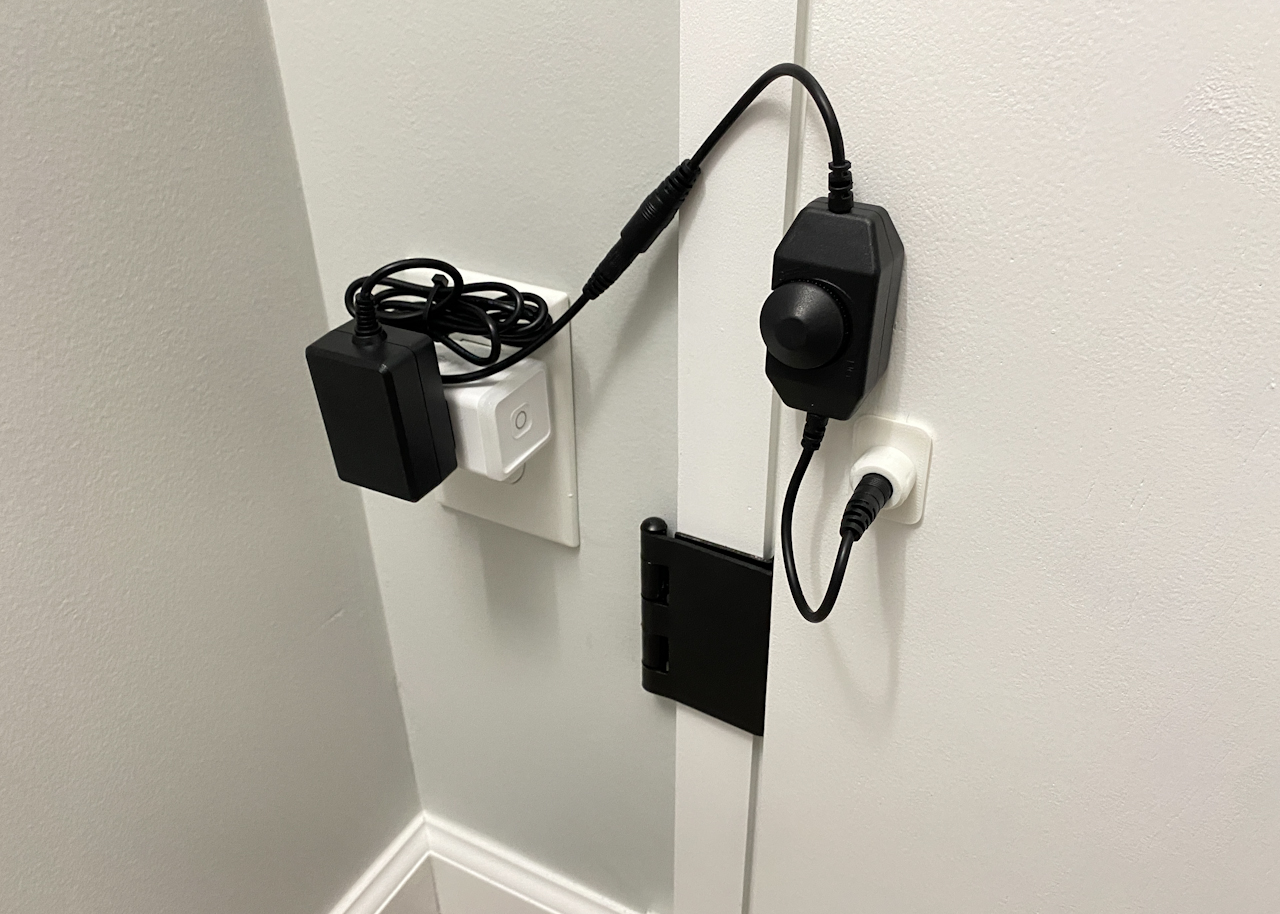
I planned ahead while rebuilding the door frame rough out and I added a plug inside the closet. The power supply for the LED’s is plugged into a smart plug so I can turn on/off the shelf lights via voice control and the dimmer switch just mounts with some double sided tape to the back of the door. That allows me to be able to adjust the dimmer when the door in open plus I can also just reach in the open side and press the smart plug button too if needed.

Here is the finished door. I always say “I can make anything” but sometimes I actually surprise myself. Is it perfect? No… but I never imagined it would come out as well as it did. I was afraid the stuff on the shelf’s might fall over when opening or closing the door but with the closet being sealed it almost has a soft open and close feature to the door when it’s moved while the air equalizes. The gap on the bottom is a little big if I was actually trying to hide anything but I was more concerned with it sagging and dragging on the floor. Only time will tell if that happens but I think it’s going to be pretty solid. I could always add another small piece of trim on the bottom if I wanted too to cover the gap.

My only other concern was the latch messing up and getting locked out of the closet (so to speak) but it turned out great too and I think it’s going to be pretty bullet proof as far as the mechanism goes.

Overall I’m so pleased with how it came out and that I could finally check one of those dream projects off the “List”.
All Information, Pictures, and Material is copyright © 2025 by Stephen Thone and may not be used for any personal or commercial purposes without the consent of the author. All rights reserved. The Author makes no guarantees or warranties as to the accuracy or completeness of, or results to be obtained from accessing and using the Information herein.+