UV Resin Lure Drying Rack
April 5, 2019
UV Resin Lure Drying Rack
This is vertical rotisserie lure drying rack that I made for hanging lures to cure UV resin clear coats.
This is how the design started out…. The lures will hang down into a round chamber that will be lined with UV LED’s. It’s pretty much like a rotisserie chicken cooker only vertical. This is probably overkill and the design is still in its infancy at this point so some test prints will have to be made to figure out if it’s going to work or not.

The motor mounts to the main gray gear (which is stationary) and will spin the green part which make the red gears rotate as they spin around the center main gear. This should provide total UV coverage to the lure as it spins and rotates around in front of the lights by keeping all sides of the lure the required 2-3 inches away from the lights.

The actual part that the lures hang from will be removable (not shown yet) and maybe attach with magnetic tips so I can change from hooks or alligator clips depending on the lure types.

The lure hanger/gears will incorporate bearings made from BB’s into their design and everything will be held together with a simple printed e-clip.

I went with a simple dovetail joint for the tips.
This is the basics of how it rotates around the main gear while also spinning the hooks that the lures will hang from.

For the light chamber I going to try and use a bucket (cut away view) and spiral a strip of UV LED’s around the inside. The rotator will mount to the lid of the bucket and simple sit on top.

With all the parts printed I start by mounting the main gear through the lid to motor.

The motor on the top side of the lid.

The lure gear holders are assembled next. Standard .177 BB’s are used to create the double bearings.

The simple e-clip holds everything together.

The removable lure holding tips can be configured multiable ways depending on the lure type.

The tips simply slide into the lure gear holders with a dovetail joint.

The rotatory assembly then just mounts to the motor shaft and is secured with a set screw.
First test of the rotatory assembly.

Ready for some lures.

This is just a few different lures for a test spin.

The actual UV chamber was made from a 2 gallon bucket and a cheap strip of UV LED’s.

Here’s how it looks all lit up. I highly doubt these are going to stay stuck to the bucket but I fix them later if they do start to fall off.
The first test spin of some mock lures. You can see how with the 360 degree lights and the vertical rotisserie setup it should keep all sides of the lures “cooking” evenly at the recommended 2-3 inches away from the lights.

To seal lures most people are using Alumi-UV Resin by Alumilite but I was a little impatient so I’m trying this Chinese equivalent Miraclekoo UV Resin that I found on Amazon because I could get in one day. I’ve seen some videos that other people have done comparing the two and they both seemed to work great so it’s worth a shot.

This was the first lure I tried the new UV resin on and I left it in the chamber for probably an hour and a half. Unfortunately it came out a bit tacky but not enough to leave finger prints. After hanging the lure in the sun for a day it seemed to fully cure. Not the results I was hoping for but still promising.

I figured I’d experiment a bit more with better lights so I picked up this MelodySusie 36W UV Nail Dryer for $26 from Amazon to try next.

It uses these type of 9W bulbs and has 4 of them so I’m hoping for better results this time.

To test this set of lights out I just turned the unit on it’s side and hung the lure in front of the light.

This time the lure came out rock hard after only 30 minutes so I think this is a better route to go over the LED’s. Next I’m going to try and hack up this nail dryer to remove the lights and see if I can incorporate them into the bucket design.

The next step was to start hacking up the nail dryer. I was hoping it was going to be pretty straight forward but it involved a lot of de-soldiering of the components to actually be able to remove them.

This is the main board for the dryer, it contains all the timer circuits and transformers (or ballasts) for the bulbs.

I designed and 3D printed a new base plate to hold the bulbs in the vertical position I needed them to be in. Here it is with the bulb sockets mounted in place.

The main board mounts to the bottom side of the new base.

The new base plate was then mounted to a circle cut from a piece of plywood.

A new switch plate was also designed and printed to accept all of the original switches and buttons.

Here everything has been mounted, wired up, and ready to be installed in the new housing. I’m still using a bucket for the new housing but this time it’s a slightly larger 5 Gallon bucket that was cut down and turned upside down. (not shown yet.)

After inserting the base into the new bucket another printed trim piece attaches to the switch plate to give it a nice finished look.

The rotisserie setup mounts to the bucket the same way as before but this time it’s actually the bottom of the upside down bucket and not the lid.

A simple printed box covers the motor, holds the motor switch, and acts as a simple handle too.

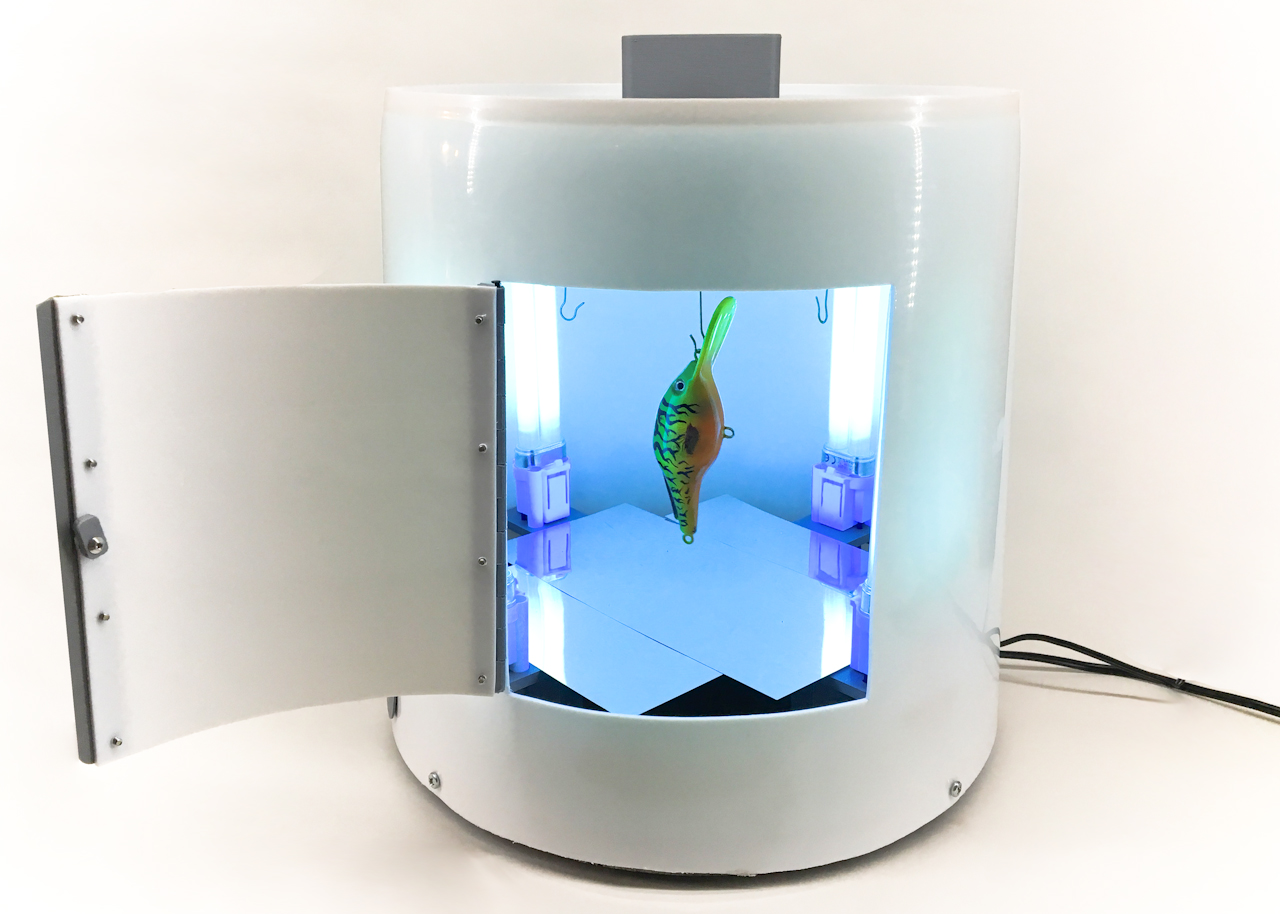
A door was cut in the side of the bucket and a printed hinge and a simple latch were added.

The door make it easier to hang the lures on the rotisserie hooks rather than lifting the lid like on the old one.

I took some of the mirror tape from the original dryer and added it to the top of the base just to add some reflection.

Some rubber feet were then added to the bottom base.

This is the overall completed setup.

This was the first test lure going for a spin.
Here is the finished project. Overall this setup works much better than the UV LED strips, it was a lot more work than I anticipated but I’m very pleased with how it all came out.
![]()
All Information, Pictures, and Material is copyright © 2019 by Stephen Thone and may not be used for any personal or commercial purposes without the consent of the author. All rights reserved. The Author makes no guarantees or warranties as to the accuracy or completeness of, or results to be obtained from accessing and using the Information herein.