ATX Bench Power Supply
February 18, 2022

ATX Bench Power Supply
This is a bench power supply made from a old computer power supply. After trying to revamp my Robotic Arm I ran into some power supply issues with it so I decided to try and make my own bench top power supply. This will probably be overkill for anything I do but I’ve seen these types of computer power supply conversion online before and thought it would be a cool thing to try. I know the bare minimum when it comes to electronics so most of what I’m doing here was learn through google.

I had several old power supply’s laying around but I chose this 230w one because it didn’t need an extra draw on it to get it to turn on.

The specs…

I did buy a break out board but ended up not using it, I just cutting off all of the plugs on the power supply.

Besides the standard 3.3v, 5v, and 12v voltages I am going to be also adding one of these Adjustable Voltage Regulator DC Buck Boost Converters I found an amazon which should allow for 0-36v.

For the 3.3v, 5v, and 12v voltages I bought these cheap voltage/current meters. These measure off the negative side with a built in shunt so I guess they can lead to so issues with multiple voltages on shared grounds but for what I’ll be using this for it probably won’t be a problem.

The outputs will all have standard banana plug jacks.

I will also use these 4 pole single throw switches on the 3.3v, 5v, and 12v lines to be able to turn them and the meters on/off individually.

Everything will be protected with fuses of course.

There will also be a duel USB socket.

This old rocker switch will be used for turning on/off the power supply.

With all of the components acquired it was time to design a case to hold everything. I took several days/hours but this is the final design I came up with in Fusion 360. I borrowed heavily from some other designs I saw on Thingiverse.

I incorporated a handle into the case design but it might be a little small.

Here is how the power supply fits in the case along with all of the other parts.

Most of the parts were just mocked up in CAD to get an approximate size to see how they will fit in the case.

Here is the main face plate that was 3D printed.

The back side… it’s blue because I only had a little yellow filament left and if I needed to print it more than once I didn’t want to run out.

I paused the print when it got to the lettering and changed to a darker blue.

Here it is with all of the components installed. A little filing was necessary but everything fit pretty well (for the most part) on the first try.

The design of the main case came out a little bigger than what I though my printer build volume was so I just ended up splitting it in two piece to print. The print time on a single piece would have been crazy anyway so two pieces is probably better. Off to printing…..

The rear piece of the case took over 12 hours to print.

The front half took up most of the build plate…

… and took over 20 hours to print. (I think this was my longest print to date.)

Stacking both pieces on the print bed shows I would have been over my print volume by just a bit. I could have edited the design a bit to fit but I still didn’t want to try a single 36 hour print.

Here are the to finished pieces ready to be glued together.

After printing I used some super glue to join the two halves together. The seam isn’t to bad but I might use some filler on it and then some hammer type spray paint on it to cover up any defects and to give it a better finished look.

4-40 heat-set inserts were then installed in the case front to mount the face plate.

The finished handle after printing. (Heat-set insert are also used on this piece.)

Here it is mounted to the case. It’s a little small but it should work well enough.

Then we have the printed side and bottom vent covers. These will just be glued in place after painting the case.

Fitment was perfect though.

Next it was onto the start of the wiring. With a little help from Google and YouTube I believe I have everything correct so far.

The wires on the power supply were a little short so I wired everything up before installing the supply into the case. I put a little hot glue on the top module to hold it in place as I forgot the cutouts for the side retaining clips.

The initial test looks like I did everything correct. The voltmeters are showing a little high compared to my multi-meter but I’ll have to see if I can adjust them.
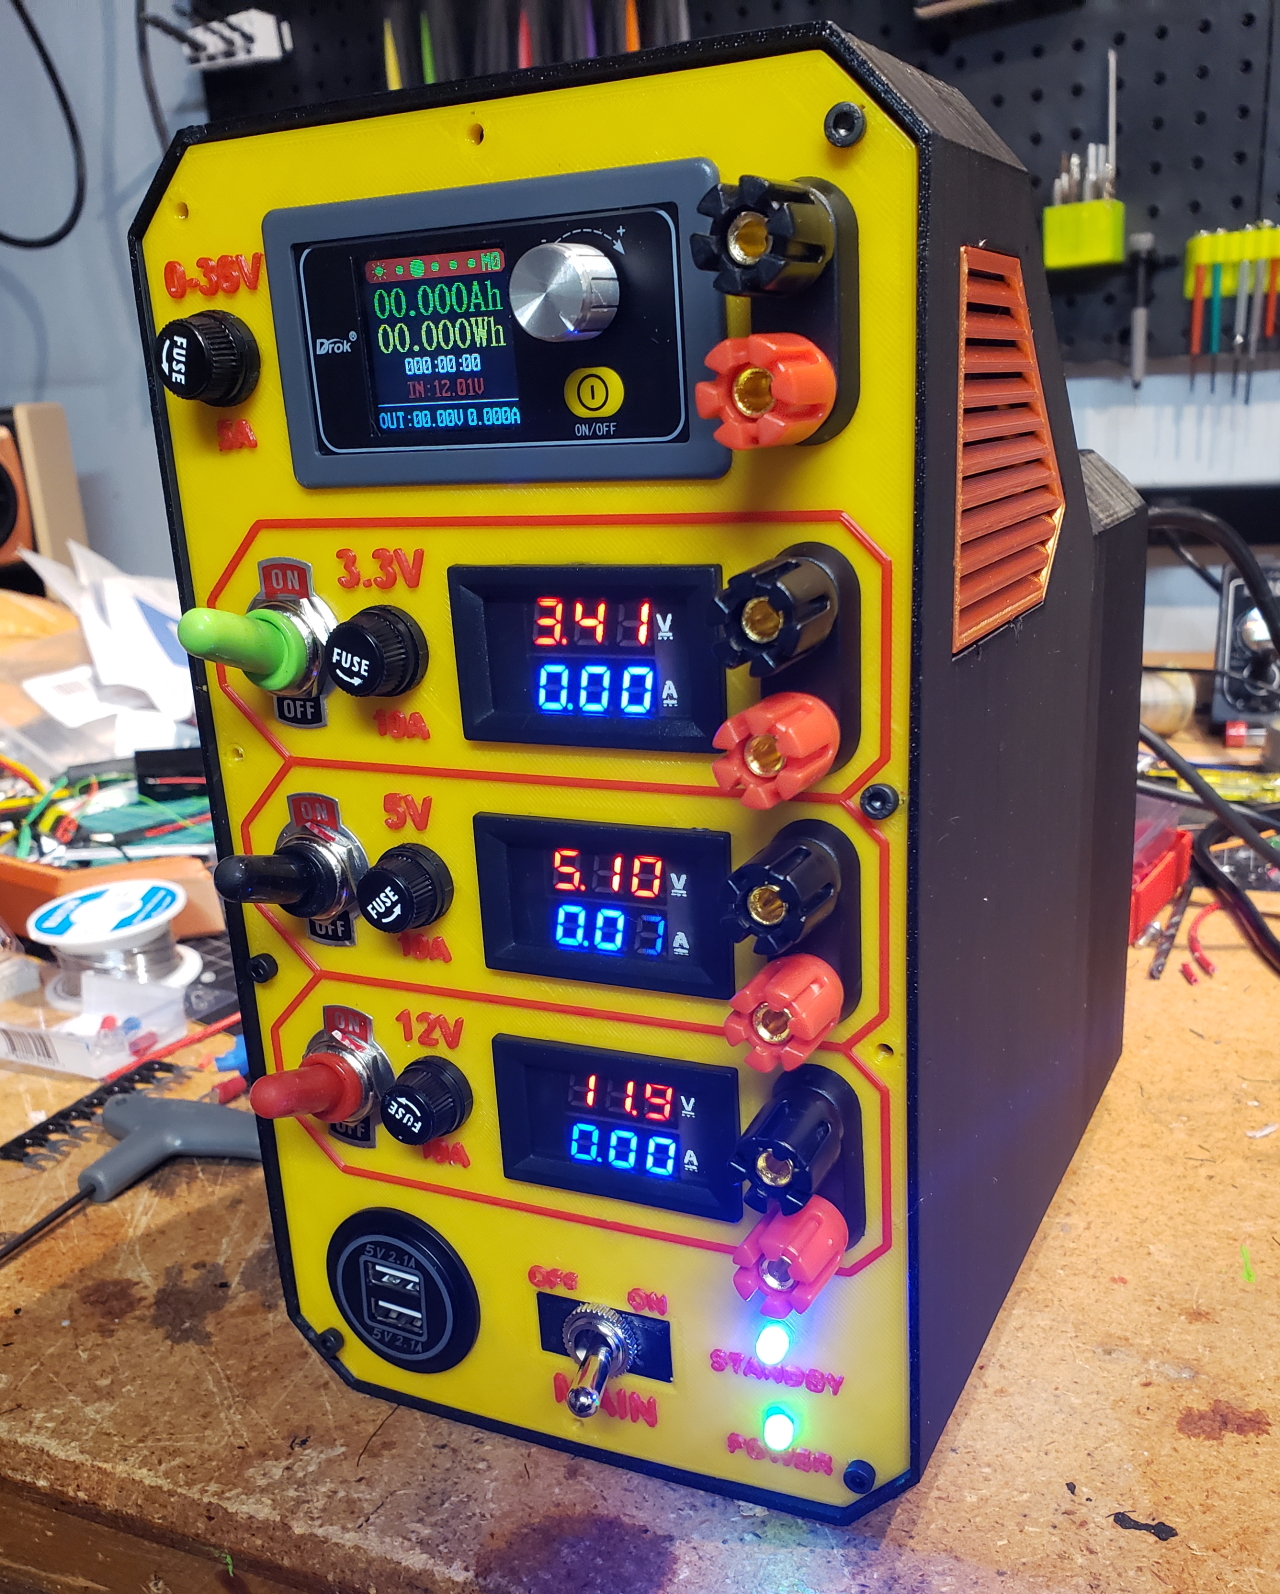
Here is the finished powers supply after painting the case.

The finish isn’t perfect but it’s good enough for me.

Overall I happy with how the design came out.

The bottom got some stick on rubber feet and the bottom vent was glued in place.

I wasn’t able to adjust the voltage displays low enough (can’t ask for much from cheap meters I guess) but they are close enough for me I guess. The amp readings are close enough though (not shown) which is what I was more concerned about. The crooked display on the variable displays bugs the shit out of me and I also noticed I screwed up the face plate… it should say 0-36V but I’ll live with it at this point. It’s ready to power some projects now.
Frequently Asked Questions
Can you make me one of these? = No sorry I do not have the time and you wouldn’t want to pay what “My Time” costs if I did.
Can I get the STL files? = STL Files for this project can be found HERE. Please be aware I will NOT be answering any questions about the build, components used, hardware used, or any questions at all about this project. I only shared the files because of so many requests.
Can you please share the Fusion 360 files so I can edit them to fit my needs? = Here is the link for the Fusion files so you can edit anything you want to make it work for your components. (keep in mind some of the work might be a mess and not everything is labeled) If you do make one though… send me some pictures and I’ll post share some builds here too.
Can you tell me how to wire everything up? = NO… I do not have the knowledge to tell you how to safely do this. See above for the links I used on figuring out the wiring…. or Google is your friend.
Can you tell me what Print Settings you used? = See link to STL Files.
How much do you charge to make these? = See first question.
(Probably in the future) The links to the parts you used are no longer available where can I get the parts? = Again… Google is your friend… I am not.
Makes
Check out this awesome make that Paul Pezalla made from the files I shared.

Here’s another great build by Bill Wales. He left access to the Molex, SATA, and PCI-6pin connectors for even more versatility.
All Information, Pictures, and Material is copyright © 2022 by Stephen Thone and may not be used for any personal or commercial purposes without the consent of the author. All rights reserved. The Author makes no guarantees or warranties as to the accuracy or completeness of, or results to be obtained from accessing and using the Information herein.
29 Replies to “ATX Bench Power Supply”
I love it! I really like projects where the builder uses stuff laying around. Thanks for sharing.
Thanks… My hoarding skills finally paid off.
Thank you for publishing this project. The timing is perfect! I just picked-up a used ATX PSU for the same purpose, and the execution of your project is exquisite!!!
Have you, or would you, make the Fusion 360 files available? While I could put similar hours into a similar design, working off of your designs would shorten the process. One thing your enclosure inspires me to do is to add the multi-color accessory, sitting on a shelf for 18 months, to my 3D printer.
Again, very nicely done!
Bob
I updated the FAQ with the Links. I do have a Palette 2 for multi color printing but I didn’t use it on this project as just doing a color swap was just easier.
Thanks… I will be uploading them to my CULTS3D page soon.
Truly a thing of beauty and utility!
Wow a really amazing piece of work. Bravissimo !!!!
I like that the orientation is portrait, space can be at a premium for a lot of DIYers. Thanks for the post.
Fantastic Job. Very creative printing. Thank you for sharing your project with us
This looks like a fabulous project but would it be possible to get a circuit diagram for the connections between the power supply and the back of the control panel?
I kind of just winged things but pretty much followed this Youtube video for most of it. https://www.youtube.com/watch?v=n_A-jkpjpcM
I have put together an ATX power supply but I’d doesn’t have a case and has a huge footprint. I too would be very grateful for the 3d print files.
Very very nicely done 👍
I’ve been working on a design like this, but with a different orientation. Yours is way better than mine. I would love if you posted the design files.
Hello Steve, the link to the voltage/current meters takes me to the variable PSU. Can you fix this? Thanks, Top Job project!
Thanks for the heads up… it should be fixed now.
I just posted the link at the bottom of the page.
Any for sale ? or where to buy similar ?
Sorry I do not sell these.. if your looking for a power supply you can find true bench top power supplies on Amazon probably for cheaper than making one of these.
Finished mine about a month ago and it’s been fantastic! I left some of the Molex, Sata and 6-8 pin power connectors uncut so I could use it to test some computer components with. Currently they are just hanging out the Right side air vent but the plan is to make a new cover for that side that will make it look nicer
It looks great… thanks for sharing your build I added a picture of it to the page.
Você doa ou vende o projeto?
Desculpe, não os vendo.
(Sorry I do not sell them.)
Great Work,
I cant seem to access your fusion files. “Unauthorized. Sorry. You don’t have permission to access this page.” any chance you could upload them elsewhere, or check the sharing permissions?
Thanks for the heads up… Fusion just changed something with the way they store files so I’m sure that’s why the link no longer works. Soon as I get some free time I’ll try to figure out how to fix the link.
The link should be fixed as of 7/1/25… if not let me know.
I can view the Fusion file, but I am unable to download/edit it, I’d like to make some changes to make it fit a smaller printbed 🙂
I don’t think Autodesk lets me share the files anymore now that I am no longer a paid user.