Snake Lure
January 30, 2019
The Snake Lure
This is a 3D printed articulated snake lure. I’ve seen a few of these done before and figured I’d have a go at one. Below is the process I went thought ot build it.


The design of this lure was done in Onshape and these pictures shows the basic design of the lure.

I originally tried to do it as a one piece printed in place type of lure but I wasn’t sure if the joints would be strong enough.

I printed the prototype at 25% infill so it floats and while it printed pretty well if flexed up and down the hinge pin piece broke and started to separate (at red arrow) from the main body. I thought about running a string down the middle so if it ever broke I wouldn’t lose the fish but this seemed like to much trouble so back to the drawing board I went.

I redesigned the pieces so the top and bottom of the hinge were a little more beefy. I also made them so they can be printed in separate pieces and then the joints will be joined after the fact with a piece of 3mm filament. I believe this arrangement should be strong enough to hold up to a halfway decent sized fish. This should also allow me to paint and seal the piece individually before assembly too and I will not have to worry about getting epoxy in the joints.

Here is a quick animation of how things should go together. The tie on and hook attachment points will also be pined in place.

Another benefit of doing it in separate pieces is I can make easily make it any length I want and there are two separate body pieces (one has a hook attachment point) so I can put the hook pieces in different places on different lures and figure out what works best.

The individual piece also printed pretty well and needed very little clean up. I just had to remove the supports and will eventually sand them a bit to clean up any rough spots in the joints.

Once assembled I think I will keep it around 12-14″ in length and maybe use 2 (maybe 3) hooks.

So far it flexes pretty good and once I add a lip it should have some good action or at least I always hope so. I need to move on to the testing phase next.

The tie on and hook attachment points have been pinned and glued in place and I also glued 4 BB’s in the head section to add a little bit of weight.

The rest of the void was filled in with spot glazing putty and sanded flat.

So far it seems to float pretty well and it sits about half draft in the water which is what I hoped for.

Next it was onto painting… I’m going with the Northern Water Snake Pattern pictured here.

I started by mixing up some pearl white with a drop of yellow and a few drops of gold. I painted that as a base coat on each piece individually.

Next I reassembled the lure and using the picture for reference drew on some guide lines using a pencil. I tried to put the darkest colors where the joints will be to hopefully mask them a bit.

After that I sprayed on some Burnt Umber brownish color using some acrylic paint I had laying around.

There’s not to much detail on the bottom but I tried to match this picture I found on the internet.

Next I had to disassemble the lure and paint all the inner parts of the joints.

I then sprayed on some copper Dr. PH. Martin’s ink to try and match the reference picture. It’s a little too strong but it came out ok.

After that I hit the brown edges with some opaque black.

I then used some tulle and a sepia detail color to give it a bit of a scale pattern.

It’s hard to pick up with the camera but the scales came out half way decent. I also sprayed a little raw umber over parts of the browns to blend it in a little more.

I probably could have done a better job if I used some stencils over just free handing everything but so far I’m happy with how it’s coming along. Next I need to make some eyes, add a little more detail, and then seal everything with epoxy.

I had to make a new wheel for my lure drying rack that would handle the sticks I used to hold the individual pieces of the lure while sealing them.

I’m using the EnviroTex Lite epoxy on these to seal them because it goes on as a much thinner coat and I hope this will still allow the joints to function when dry. I only sealed two pieces to begin with just as a test so if it doesn’t work I don’t have to redo everything. Hopeful I didn’t just glue the stick to the piece in the process. I’m going to let these two pieces fully cure before I go any further.

I did end up gluing the sticks to the pieces but I was able to snap them off and just drill out the left over stick pretty easily. The joint seems like it should still work too.

Next I moved on to making the eyes. I took the eye from the reference photo and stretched it out a bit before printing. Folding the mixed epoxy up in a piece of wax paper and snipping off the end allows for better control of applying the epoxy to the printed eyes because you can just squeeze it out. (I found this method on YouTube and it’s like piping icing on a cake.)

I also tested a new method of applying packing tape to the eyes (the ones on the left) before cutting them out. This kept the thinner epoxy from running off the eyes and soaking into the post it note. (as see on the middle and right eyes.) The tape also keeps the epoxy from soaking into the printed eye changing the colors. The eyes on the left are much brighter.

After gluing on the eyes and adding a little detail like mouth scales to the head with a fine tip marker I went ahead and finished sealing the rest of the pieces. Next it’s onto final assembly where I’ll try to glue the pins in with out bonding up the joints too.

Final assembly was done by cutting pins out of 3mm filament that sit just below the bottom of the lure. A drop of CA glue was then placed on top and instantly cured with accelerator so the glue didn’t seep into the hinge. I think I might modify the design and use small screws for the joints. This way I could actually change the length and hook configuration if I wanted to.

Here all of the joints have been connected.

After that I mixed up a little more paint and tired to camouflage the pins. It’s a little rough but as always the fish don’t mind. After the paint was dry I then seal it with a little more epoxy.

To make the lip I traced the 3D printed template onto a piece of acrylic and rough cut it to shape on a bandsaw.

Next I glued the printed template to the tape side of the rough cut acrylic piece and filed it to final shape using the template as a guide

The lip will be eventually glue in place with CA.
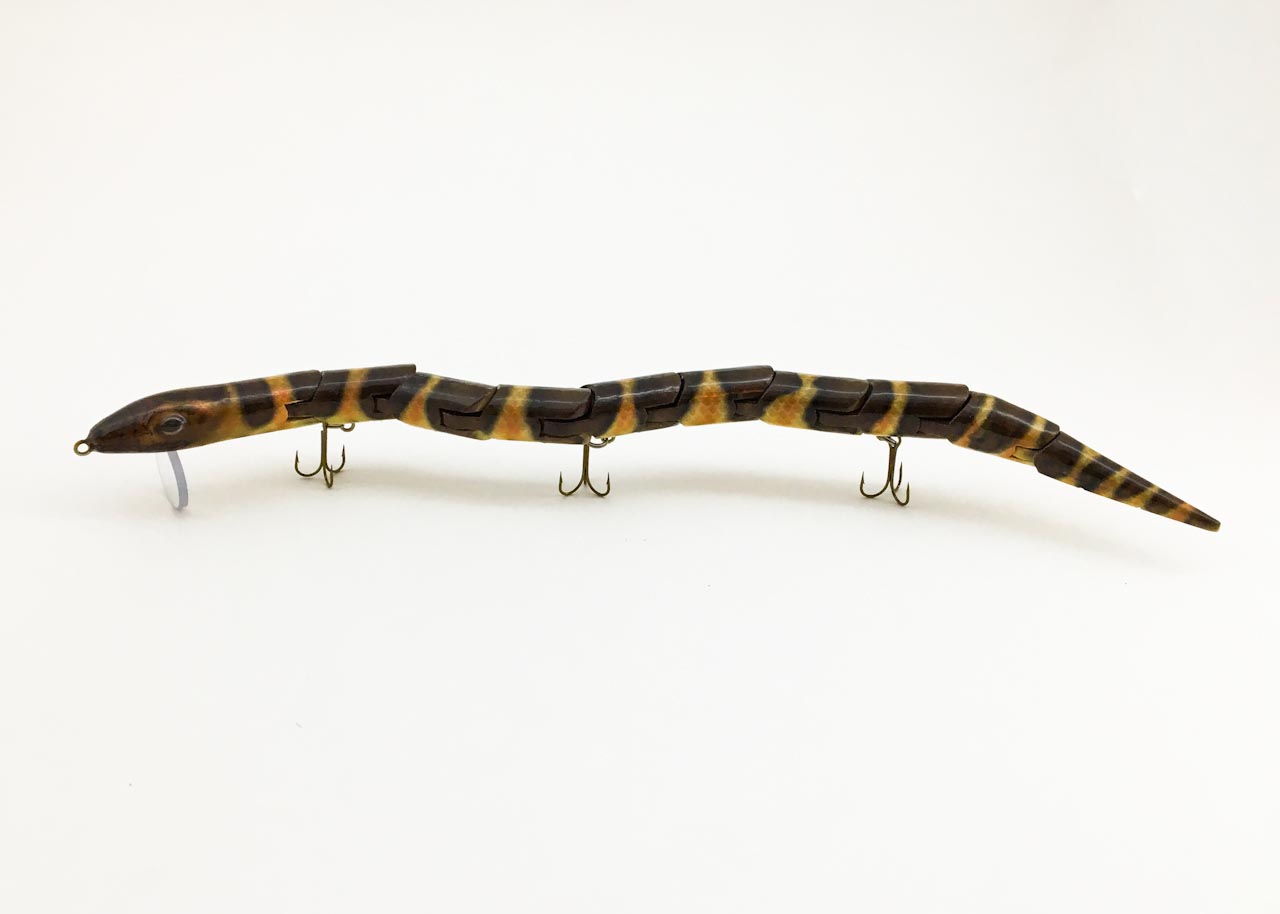
After adding some split rings and hooks the lure is complete and ready to fish.

Overall it was a lot of work but it ended up coming out great…

… I’m almost afraid to fish with it for fear of losing it.

I went back and edited the design a bit to allow the use of 2-56″ x 1/2″ flat head screws to secure the joints. This will allow me to change the length and hook configuration any time I feel the need. This is a stubby version for testing but it should work a lot better than the glued pins and I can just paint the screws to help hide them. Next I’m going to work on some stencils to help paint all the sections the same so if I do change things the painted patterns will still match up.
![]()
All Information, Pictures, and Material is copyright © 2019 by Stephen Thone and may not be used for any personal or commercial purposes without the consent of the author. All rights reserved. The Author makes no guarantees or warranties as to the accuracy or completeness of, or results to be obtained from accessing and using the Information herein.